Keeping a clean kitchen is a common goal, but it sometimes feels like an uphill battle, especially when it comes to stovetops. For those who love to cook, the stovetop is both a friend and a foe. It makes creating delicious meals possible, but it also tends to accumulate a fair amount of grime and splatter. One of the most stubborn cleaning challenges is dealing with caked-on splatter on stovetop burners. This is where my mama’s trick comes into the spotlight.
My mom, a culinary wizard in her own right, has always had a knack for maintaining a pristine kitchen with minimal effort. Her secret? A simple, effective hack that requires almost no elbow grease. This method not only leaves your burners sparkling clean but also saves you time and energy. Let me share this magical trick with you, so you can keep your stovetop as spotless as my mama does.
1. The Zero-Effort Burner Trick My Mom Swears By
The secret to my mom’s effortless cleaning trick lies in using ammonia—a common household cleaning agent. Ammonia works wonders by breaking down grease and grime on a molecular level. Here’s how it works: you take each burner and place it in a sealable plastic bag. Add about 1/4 cup of ammonia into the bag before sealing it tightly. The key is not to submerge the burners in ammonia, but rather to let the fumes do the work.
Leave the bag sealed for at least 12 hours, or overnight if possible, in a well-ventilated area. The fumes from the ammonia will loosen the caked-on splatter, making it easy to wipe away with a cloth. This approach saves you from the arduous task of scrubbing and is incredibly effective for even the most stubborn grime.
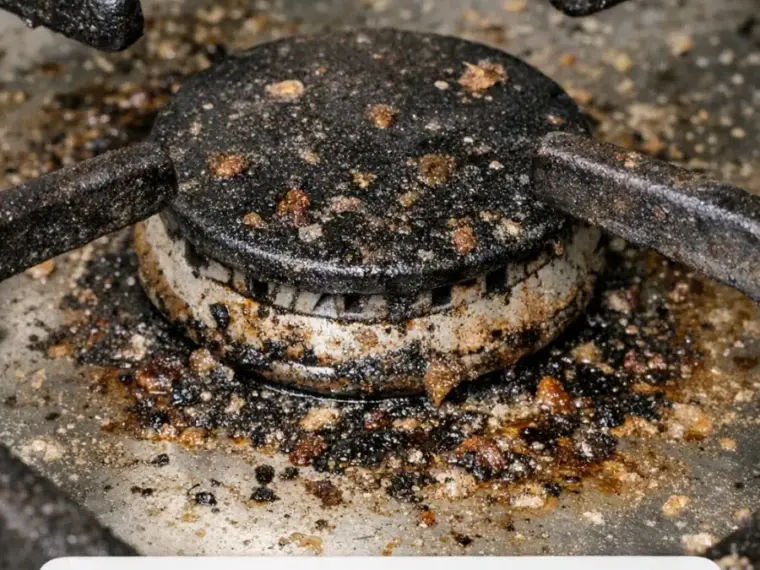
2. Why Stovetop Burners Get So Caked With Splatter
Stovetop burners are notorious for collecting splatter because of the nature of cooking itself. When you fry, sauté, or boil, tiny particles of food and grease are propelled into the air, settling on any nearby surface. Over time, these particles accumulate, especially if they’re not cleaned immediately.
The heat from the burners also plays a role in solidifying these particles, making them tougher to remove. Additionally, busy schedules often mean that cleaning is postponed, allowing the splatter to dry and harden. This is why a simple wipe-down after each use isn’t always enough, and deeper cleaning methods become necessary.
3. The Simple Household Items You Need To Pull This Off
To execute my mom’s brilliant cleaning hack, you will need the following items: sealable plastic bags (large enough to fit each burner), ammonia (which you can find at grocery stores or hardware stores), and a pair of rubber gloves for protection. It’s also helpful to have a soft cloth or sponge on hand for wiping down the burners afterward.
Having a well-ventilated space is crucial when working with ammonia due to its strong fumes. If possible, work near an open window or outside if the weather permits. These simple tools are all you need to transform your grimy burners into gleaming kitchen fixtures.
4. Step-By-Step: How To Prep Your Burners For The Hack
Begin by removing the burners from your stovetop. Make sure the stovetop is cool to the touch before handling any components. Once removed, give the burners a quick rinse to remove loose debris. This will allow the ammonia fumes to penetrate more effectively.
Next, place each burner into a separate sealable plastic bag. This is crucial to ensure that the ammonia fumes can fully envelop each burner. Add approximately 1/4 cup of ammonia to each bag, then seal them tightly, making sure there are no leaks. Now, your burners are prepped and ready for the magical transformation.
5. The Secret Soak: Let Time Do All The Scrubbing For You
The beauty of this method is that it requires minimal intervention from you. Once the burners are sealed in their bags with ammonia, they need to be left alone for at least 12 hours. Overnight is ideal, as it allows the fumes ample time to work their magic.
During this time, the ammonia fumes will soften and lift the baked-on food particles and grease that have adhered to the burners. This process doesn’t require any scrubbing from you, allowing you to focus on other tasks or simply relax. Patience is key here, as the longer the soak, the easier the cleanup will be.
6. Wiping Away The Gunk: Revealing The Clean Metal Underneath
After the soak, carefully open the bags in a well-ventilated area, avoiding inhaling the fumes directly. Using your rubber gloves, remove the burners from the bags. You’ll notice that the grime has loosened considerably.
Take a soft cloth or sponge and gently wipe away the gunk. You should find that most of the residue comes off easily, leaving behind the clean, shiny surface of the burners. In most cases, a single pass with the cloth will suffice, but feel free to rinse and repeat if necessary.
7. What To Do With Extra-Stubborn, Burned-On Spots
Occasionally, you may encounter particularly stubborn spots that haven’t fully come off after the initial wipe. For these areas, a bit of extra attention is required. Create a paste of baking soda and water, applying it directly to the tough spots, and let it sit for about 10 minutes.
Use a soft scrub brush or an old toothbrush to gently work the paste into the residue. This should help lift the remaining grime without damaging the surface of the burners. Rinse thoroughly with water and dry the burners before reattaching them to the stovetop.
8. Safety Tips: Protecting Your Stove, Hands, And Kitchen
Safety is paramount when using ammonia, so it’s essential to take precautions. Always wear rubber gloves to protect your skin from irritation. Ensure the area is well-ventilated to avoid inhaling fumes, and never mix ammonia with other cleaning agents, especially bleach, as this can create toxic gases.
When working with any cleaning solution, it’s a good practice to test it on a small, inconspicuous area first to ensure it doesn’t damage the material. Once you’re done cleaning, wash your hands thoroughly and store any leftover ammonia safely out of reach of children and pets.
9. How Often To Use This Trick To Keep Burners Looking New
To maintain a clean and tidy stovetop, it’s best to use this trick as part of a regular cleaning routine. Depending on how frequently you cook, a monthly cleaning session using this method should suffice.
If you’re an avid cook or frequently preparing meals that splatter, you might find it beneficial to perform this cleaning every couple of weeks. By maintaining a regular schedule, you can prevent the buildup of grime before it becomes a significant issue, ensuring your burners always look their best.
10. Other Surfaces In Your Kitchen This Hack Works On
While this method is designed specifically for stovetop burners, ammonia is a versatile cleaner that can be used on various surfaces around your kitchen. For instance, it’s highly effective at cleaning oven racks, and can even be used on the inside of the oven if properly ventilated.
Ammonia is also useful for removing hard water stains from glass surfaces and cleaning tile grout. Always follow the same safety precautions and conduct a spot test before applying it to new surfaces to ensure it won’t cause any damage.
11. When This Method Won’t Work—And What To Try Instead
There are instances where this method might not be suitable. For example, if your burners are made of materials that react adversely to ammonia, alternative methods should be considered. Additionally, heavily damaged or corroded burners may not respond well to this treatment.
In such cases, consider using a commercial stovetop cleaner designed for your specific burner type. For electric stovetops, which have different components, it’s best to follow the manufacturer’s cleaning instructions to avoid damage. If in doubt, consult the appliance manual or seek professional cleaning advice.